Showing posts with label homemade costume. Show all posts

Saturday, September 14, 2013

The Visitors take Shape


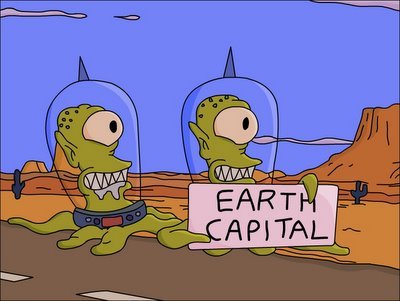
Kang and Kodos have taken the first steps in their quest for world domination: they have grown bodies. At this stage they are infant bodies, granted, but they are bodies nonetheless. The workflow has largely followed that of previous Halloween endeavours - shaping the costume out of wire, overlaying the frame with soft card, then papier mache. So far, we are one third of the way through this year's routine.

There has been one addition to this year's materials: foam insulation tubing (which appears not to have a name here, but referred to as backer rod by North American retailers from what I've seen). This wasn't my first experience with the material, having used it to make dreadlocks for my Predator costume. The reason I elected to use it for this project is because I thought it would make for a more tidy framework, rather than using nothing but wire. I've found that constructs from wire are quite bumpy and uneven, usually looking pretty poor until card and papier mache even things back out at a later stage. The first step in creating this year's costume was thus:


There are three lengths of tube there, held together at the joint with duct tape. Of course, sticking to my 'cut now, ask questions later approach' I didn't carry out my due diligence with what has come to be known as the 'doorway test' (I and my friends have been felled on more than one occasion by the width of door frames; I usually take it as a sign that I'm on the right track when a costume work-in-progress is touch and go). Later I would discover that it was a little too big; but luckily, the tube has attempted to resolve itself back into its natural shape against the duct tape, the result being a bit more of an oval shape. It is subtle enough that it hasn't ruined the shape, but it makes it just about narrow enough to get through doors. 

The next step was to start building up the frame. Another reason why I went with the insulation tube was its flexibility:


I wanted to shape it from four sides and have the lengths of tube meet at the top. This took several lengths that began a little something like this:


This was a tricky juncture; while the tubing was flexible, it didn't stay in shape on its own accord. The next task was therefore one of multitasking, attempting to hold the material in shape while stitching wire around it that would hopefully do a more permanent job:


We created wire circles from the base to the top. From studying dozens of reference photos we arrived at the conclusion that they don't have any kind of defined shape (they are essentially blobs, after all). But for the purposes of construction, we gave them a more rounded appearance that was inspired from the best Kang and Kodos costume we have found online. This is how each costume looked once the circles had given shape to the frame:


With this step complete, we gave the skeleton more shape and support by running wire vertically from base to tip. That brings us to the current state of the costumes: 

"I'm Kang..."
"...and this is my sister, Kodos."

The next step is to overlay the frame with soft card as a primer for papier mache which, in the last couple of years, has helped to boost the robustness of our costumes. When they're as obtrusive as ours usually are they inevitably take a beating in a packed venue, so it's a particularly important step. I don't want to jinx myself, but I always consider the wire framing the hardest and most awkward part of the process. I'm hoping that from here on out it is mostly monotonous work. This is the first costume since my first Halloween outing as Evil Dead's Ash that I haven't had a mask, as such, which I'm hoping removes some of the more intricate and time-consuming work.

Sunday, August 25, 2013

Halloween 2013 will be Intergalactic


At least, I hope so. I've been reluctant to confirm, even in my head, the idea that has been knocking around in there for the last few days because of the sheer work that it promises to entail. I'm not averse to putting excessive hours into a Halloween project (clearly!) but real-world commitments threaten to be a little more imposing this season, and part of me thinks that this idea would push me for time were I free as a bird. 

However.

Upon inspecting the date of my first post on the blog last year, I noticed that I was similarly tardy in getting into gear last Halloween, and that worked out okay. It was, in fact, this very date last year. And, much like this post, it was a mere declaration of intent without having made any meaningful start. It wasn't without some stress, sure, but that made it all the more gratifying in the end. 

This idea is predicated on the sheer fun of building a team costume last year. The final costume will likely be bigger, but mercifully there are likely to be less individual components. And, while I thought it would be hard to top the recognition that last year's duo would garner, I think this team-up would make at the very least a good stab at it. 

This year, we will go on an earth conquest mission as the lovable alien duo Kang and Kodos, of The Simpsons fame:

Actually, we're Quantum Presbyterians.

Sure, The Simpsons isn't what it used to be (in my eyes anyway) but it has left an enduring legacy of lovable characters and endlessly quotable nuggets of wisdom. This costume idea ticks pretty much every box I have when it comes deciding on a project. It's big, it's eminently recognisable, and it fits the profile of previous work in terms of workflow. It also ticks a recent addition to the criteria list materialising out of last year which is, where possible, a team costume is the way to go.

It will be a long two months with plenty of peaks and troughs, but I wouldn't have it any other way.

Saturday, November 3, 2012

Halloween 2012 in Pictures

One of the reasons I frequent the same club every year is the effort they put into documenting the night. Usually my costumes are too cumbersome to carry a camera, despite my own strong interest in photography. It's a real conflict, because this is exactly the type of photo opportunity that I would lap up in normal circumstances were I not part of the subject. In particular, the studio set up that Freakscene puts together is a major attraction for anybody that puts effort into their costume and wants a high quality document of it for prosperity. I have collated those studio images of The Zombies here, in addition to those of the outstanding AT-ST created by my buddy Mark. The studio shots were taken by Nathan Richardson of Splinter Images while photographer David Hegarty shot the walkabout images shown after them. 


Sunday, October 28, 2012

Til Undeath Do You Part

Well, they're getting closer to the big zombie betrothal. Only a couple of structural issues left, and then we're onto the blissful decorative portion of costume making. The painting is always my favourite part, which is a pity because it's always confined to the last couple of panicked days. My guy does have finished legs too, but they don't support the weight of the body on their own. Another issue to figure out...


("Undeath" seemed like an erroneous title, given that they are already undead, but Google failed to provide the answer. Unlife?)

Sunday, October 21, 2012

Sticking to what you know

Most of the best LEGO costumes I've seen have followed a similar method for making the head: a base and a top both made from styrofoam, with a strip of card folding around the diameter sandwiched between them. If that's not the best explanation, than see for yourself: two of my personal favourites can be found here and here.

Just about every costume I've done so far has prominently featured wire. Wire is great because it's almost limitless in what it can be shaped to. However, the method discussed above made a lot of sense. In previous costumes, wire was a good option because the head shapes were intricate. The head of a LEGO minifigure is quite straight forward, making styrofoam more appealing; the only work one would have to do is taper the edges into smooth curves. Furthermore, the infamous head is so smooth and free of imperfections I felt that it would be impossible to replicate that smoothness using the wire method. As well as it has served me, a smooth finish it does not always make. 

With this in mind, I decided to opt for styrofoam. I had enough to do the neck, which was straight forward and turned out as well as I'd hoped (see here). After this, I only had enough foam to make a start on the base; however, a start was all I could make. Days after making this start, I began to resent the difficulties I appeared to be having in sourcing more styrofoam for the project. In the end, I felt that I had to start thinking about contingencies. With this in mind, I began to experiment with a wire frame. 

This has so far proven to be quite fruitful, to the extent that I have abandoned my search for styrofoam. The smoothness issue I feared was addressed by overlaying the wire frame with very light cardboard (the flexible type that cereals are typically packaged in). Despite substituting styrofoam for wire, I have followed the base/top method outlined above. Here is a quick pictorial rundown of the progress so far (written instructions will eventually follow):

Lego homemade costume head

Lego homemade costume head

Lego homemade costume head

Lego homemade costume head

Lego homemade costume head

Lego homemade costume head

Lego homemade costume head

Lego homemade costume head

Lego homemade costume head

Lego homemade costume head

Lego homemade costume head

Lego homemade costume head

Change is as good as a rest

...or something along those lines, I believe. In an unprecedented move, I have changed my costume idea only a couple of short weeks before the big day (short weeks at the time I conceptualised the change; I'm avoiding eye contact with the calendar as I write this sentence). When I say that I have changed the costume idea, I don't mean wholesale changes; I mean more superficial ones. At the core, the costume is the same: I am still making what promises to be an unwieldy representation of a LEGO minifigure. Moreover, I am still making what promises to be an unwieldy but hopefully amusing LEGO zombie. Only the plastic shuffler will be different zombie from what I had planned.

When The LEGO Group released the Minifigures line in 2010 we were treated to the inaugural LEGO zombie minfigure. As I referenced a couple of posts back, this guy fast became a fan favourite and pretty hot property in the after-market. In 2012, however, TLG added to the portfolio of macabre minfigures with the release of the Monster Fighters line. Perhaps taking notes from the popularity of the original zombie, the theme contained a number of undead variants. This, in itself, didn't have too much of a bearing on my choice of zombie for Halloween purposes. However, when my girlfriend began her own search for a costume, a lightbulb was switched on somewhere above my head. 

Lego 9465 The Zombies
Introducing The Zombies: Mr. and Mrs.


This delightful couple appeared in set  9465: The Zombies. With Ciara in search of a costume, they came to mind as having the potential to be our first ever group-costume (indeed we have had some spectacular mismatches over the years; none more pronounced than my T-1000 in tow with her Guido from Pixar's Cars). 

Thankfully the transition from one zombie to another was smooth. I had not yet progressed beyond what I detailed in my previous post, and the core of the costume would be the same. I have now gone further with the costume, but I am still on the core elements rather than the decorative. Accordingly, I still have some design issues to negotiate. Specifically, I am now revisiting the idea of completely changing from the original zombie to the undead bridegroom. Instead, I am leaning towards an amalgamation which might look something like this:

lego zombie minifigure


Now, the purist in me feels like it should be one or the other. But logic dictates that this amalgamation would make the most sense for a number of reasons. Fundamentally, the original zombie's mouth is open wider. Given that I will be seeing through the mouth, this is very important. Besides, the amount of people on the night who would know the difference is minimal. 

The only real debatable point is the top hat; on the one hand, it highlights that the zombie is part of an undead wedding party. Seeing this version without the Bride by his side might not necessarily tell you this. On the other hand, including the top hat would hide the stud on this head: the quintessential feature of the LEGO minfigure. Given that I'm already deviating from tradition with grey rather than yellow skin, a part of me is worried that it might not be immediately identifiable as a LEGO minfigure full stop without it. This is one that I'm still negotiating, but mercifcully progress has been good and I have to decide pretty imminently.

Friday, March 16, 2012

Concerning the Conceptualisation of Costumes...

It's a shame that the nature of this blog leaves it dormant for much of the year. During those months between finishing one costume and the frenzy of starting the next, subject matter is thin on the ground. This year, my aim is to augment the usual August(ish) to November activity with a bit of extra content; by articulating some of the brainstorming activity that typically goes into new a costume idea. 


Friday, November 11, 2011

Fully Built: Mike Wazowski!

mike wazowski monsters inc
Step 1: Take your Mr. Potato Head costume from last year's Halloween ball.

Given that the above was our first actual step towards building this costume, it makes this post tricky in terms of making it a full instructible article.

Saturday, October 22, 2011

See how I transformed this old rat into a most delightful hat...

From the outset I mentally divided the Mayor's construction into thirds: his head, his hat, and his body. Keeping this outlook, I can now say that I am two-thirds through the costume. Perhaps that is taking liberties given the proportionality of work between the hat and the body, but I'm going with it. The hat itself took longer than I expected it to, but I am content with the result. 

Sunday, October 16, 2011

We've got to find Jack! There's only 365 days left until next Halloween!

Well, not quite, unfortunately. 15 days and counting, and the pressure is on.

I certainly didn't expect to be making the first progress entry of 2011 on October 16th. What happened? Well, a combination of two factors; the first being real life commitments. The bane of Halloween costume making, which demands so much time toiling over rolls of wire, pots of paste, scraps of newspaper and scribbled blue-prints (for those costume elements that aren't composed completely off the cuff). The second factor has been the bigger of the two, but the more unexpected one: this has been my hardest costume yet.

Tuesday, September 6, 2011

Fully Built: Mr. Potato Head


mr potato head toy story


The construction of my Emporer Zurg costume was a collaborative effort. Without the help of my girlfriend, Ciara, I would not have gotten very far past the head and torso. Fabrics are just not my strong point. They are not any point on my skills radar, really. In return for Ciara's invaluable input to my Zurg costume, I helped her construct her Halloween 2010 costume. We decided to share a Pixar theme in our costumes, ultimately choosing Zurg's film compatriot Mr. Potato Head.

Sunday, September 4, 2011

Fully Built: T-1000

terminator t-1000

Maintaining a seasonal blog presents unique challenges. Forget the old SEO chessnuts of tagging, key words, descriptive titles, links to and from other blogs and so on; it's much harder not to let a blog die a death if you're not putting out fresh content on a regular basis. How do you achieve this when you're making one costume a year, and your blog is based on the costumes you make? Something I'm still trying to figure out. But for now, at least, we're approaching silly season again with Halloween very much on the horizon. Not for normal peoples' standards perhaps, but for me, I feel like I'm late in starting my costume. But more on that later.

For now, there is one more past costume to add to the index. The greatest movie villain of all time, bar none. Perfectly portrayed by Robert Patrick: Terminator 2: Judgement Day's T-1000.

Tuesday, November 2, 2010

Fully Built: Zurg


emporer zurg toy story

The cumulative effort which went into Zurg is split into a number of different posts here; but I wanted to compile all the photos which were taken from beginning to end (significanly less towards the end, as I struggled for time) to show the evolution of the costume. It invariably starts with a piece of wire, and a simple shape.

Sunday, August 8, 2010

That Time of Year Again...

This is the first year I've really been indecisive about my costume idea. While last year commitments stopped me from getting a start on the costume until mid-September, I pretty much knew I wanted to be T-1000.


I began this year with an idea that had been floating around my mind from the previous Halloween; none other than the Mayor of Halloween Town himself, of The Nightmare Before Christmas fame. The film is an old favourite of mine, and who better to embody the spirit of Halloween? I immediately began to think of how I would construct him and nail his features; most notably his swivelling head, which rotates depending on his mood (see above, left).


My indecisiveness raised its head when I started playing Bioshock on the PC. I got sucked into the game (more addictive than a barrell of MSG) so naturally my mind started wandering to Bioshock-related costume ideas. Pretty soon I decided I wanted to be a Big Daddy. I mean not only was it a Bioshock costume; it also satisfied my usual criterion of being utterly ridiculous. Inspired by some amazing attempts by others, I was pretty sure this is what I wanted to be. My mind kept drifting back to the Mayor though; in addition to the fact that my girlfriend had decided to go as Nightmare's Sally. In the end I conceded that it was a better idea than Big Daddy, and got down to work. Huzzah, I had made a decision! I drew some concept sketches, mostly to figure out how I'd make myself as big around the waist as the plump Mayor.

As the summer went on though, I just didn't feel inspired to get started. The idea had lost some of its novelty on me, and I wasn't too excited by it. So, when my girlfriend asked if I'd consider going as Zurg from Toy Story 2 (we are both huge Pixar nuts) a little light bulb went off above my head. I had found my costume idea.


For the last few days I've just been figuring out how I'm going to go about doing the costume. I think it has the advantage of being very doable, while having the potential to be totally ridiculous. I think it ranks ahead of Ash and T-1000 in terms of ambition, but definitely behind my Alien and Predator reprisals in previous Halloweens. Updates to come as they happen.

Sunday, May 9, 2010

My work so far...

I don't have a background in any sort of design or crafting. The only semblence of an artistic background is my knack for drawing, drilled into me from an early age by my hugely talented brother. A wider approach to art was taken when I pursued it as a secondary school subject, but my interest unfortunately faded (thanks in no small part to a teacher who seemed to constantly have it in for me). This particular hobby came about as a result of making my first Halloween costume in 2006.

I think most people go through three phases of Halloween enthusiasm. There's the obvious first stage, when we don witch and devil masks and go trick or treating. But inevitably we grow out of that as angsty teenagers, and Halloween becomes a non-event for a few years. This is until we hit that magical age of legal drinking, and start going to pubs and clubs. My favourite memory of Stage 1 was my first attempt at a homemade costume. It was a portrayal of Todd McFarlane's 'Spawn' of which I was a huge fan at the time (somewhat inappropriately!). On the one hand I'm disappointed that no photographic evidence remains of this; but on the other, it is probably a pale shadow of the glorious costume I've built up in my memory banks. Stage 2 was largely forgetful; save for that one year when two friends and I made characture masks of F1 drivers and went trick or treating (putting our knees in our shoes outside each door, in a vague attempt to convince people we were young enough to pull it off).

Stage 3 brings me to the beginning of this blog's content. It was October 2006, and I had just come of drinking age. When I realised, the week before Halloween, that going to a party would actually involve making a costume, it didn't take long to decide that I was going as my all-time favourite movie character: Ash Williams, of Evil Dead fame.


In 2006 Halloween was a Tuesday, and I believe it was the Thursday previous I started making the costume. The first step was a quick shopping trip, attempting to find 1) the right coloured shirt, and 2) a toy shotgun. After finding both, it was time for my first build.

It was a fairly rushed attempt; I was fairly happy with the outcome though, and very happy with the fanfare I received at the party (Freakscene in Cork has become the tradition).


In 2007, I decided to start earlier and be a bit more ambitious. I had well and truly caught the bug.

I've no idea what my thought process was that led me to thinking about Halloween in August, or how I came up with the idea; but I knew what I wanted to be: Predator.


This was a longer and more arduous process but I was delighted with the outcome, particularly because it landed me the prize for Best Costume at Freakscene.


No sooner had Halloween 2007 passed when I started thinking about its successor. This was only natural, because spending that long on Predator inevitably got me thinking about whether or not it was possible to do Alien.


I initially convinced myself I was crazy for even contemplating it, but seeing the spectacular work of others when I went searching online really inspired me. This, combined with procrastinating from studying in May (in my final college exams no less) resulted in a prototype Alien foot. After 5 months of working (culminating in having to stitch myself into the costume on Halloween day itself) I had done it. This was a group costume, with my friend Mark going as an amazing Power Loader. Together we scooped the prize for Best Costume, successfully defending my trophy.


I was to relinquish that title to Mark in 2009 (well, in principle; he actually didn't hear himself being announced as winner for his Discworld's 'Luggage' costume and it defaulted to somebody else). This year I had not been able to dedicate the same amount of time to my build as I had done for Alien and Predator, due to my research masters running throughout the summer. It was a pretty rushed job which started in mid-September, (a combination of words scuffed at by most people!). Keeping it in the movie-theme, I went as the undisputed greatest villain in film history: T1000.


Despite not winning I was happy with how it turned out (given that I was still painting on Halloween day itself). The fanfare wasn't as extensive, but I got a decent enough reception all the same.

That brings me to 2010. I'll be posting up updates as they come; I'm determined to dedicate more time to this year's build than last year's. I've not fully decided on a costume, because of issues that I have yet to work out.

I'll be posting up detailed accounts of how I created Alien and Predator in particular (I'll try to give a description of Ash and T1000 too, but lack pictures). I can only hope they are as informative and helpful to somebody as other costume blogs have been to me.